2008年12月17日 星期三

使用 dmidecode - DMI table decoder 來查看硬體資訊

GNU/Linux 系統上面有個很方便的套件可以拿來查詢目前主機上的一些硬體的資訊
像是 CPU 就可以使用 sudo dmidecode --type processor
就會得到以下的結果
Handle 0x0004, DMI type 4, 35 bytes
Processor Information
    Socket Designation: Socket 775
    Type: Central Processor
    Family: Pentium D
    Manufacturer: Intel
    ID: 65 0F 00 00 FF FB EB BF
    Signature: Type 0, Family 15, Model 6, Stepping 5
    Flags:
        FPU (Floating-point unit on-chip)
        VME (Virtual mode extension)
        DE (Debugging extension)
        PSE (Page size extension)
        TSC (Time stamp counter)
        MSR (Model specific registers)
        PAE (Physical address extension)
        MCE (Machine check exception)
        CX8 (CMPXCHG8 instruction supported)
        APIC (On-chip APIC hardware supported)
        SEP (Fast system call)
        MTRR (Memory type range registers)
        PGE (Page global enable)
        MCA (Machine check architecture)
        CMOV (Conditional move instruction supported)
        PAT (Page attribute table)
        PSE-36 (36-bit page size extension)
        CLFSH (CLFLUSH instruction supported)
        DS (Debug store)
        ACPI (ACPI supported)
        MMX (MMX technology supported)
        FXSR (Fast floating-point save and restore)
        SSE (Streaming SIMD extensions)
        SSE2 (Streaming SIMD extensions 2)
        SS (Self-snoop)
        HTT (Hyper-threading technology)
        TM (Thermal monitor supported)
        PBE (Pending break enabled)
    Version: Intel(R) Pentium(R) D
    Voltage: 1.2 V
    External Clock: 200 MHz
    Max Speed: 3800 MHz
    Current Speed: 3000 MHz
    Status: Populated, Enabled
    Upgrade: ZIF Socket
    L1 Cache Handle: 0x0008
    L2 Cache Handle: 0x0009
    L3 Cache Handle: Not Provided
    Serial Number: 
    Asset Tag: 
    Part Number: 
使用的關鍵字有 bios, system, baseboard, chassis, processor, memory, cache, connector, slot
當然還有細微的使用方式像是想要查詢現在電腦主機上面插著的記憶體資訊就可以使用 sudo dmidecode --type 17
Handle 0x001A, DMI type 17, 27 bytes
Memory Device
    Array Handle: 0x0019
    Error Information Handle: Not Provided
    Total Width: 64 bits
    Data Width: 64 bits
    Size: 512 MB
    Form Factor: DIMM
    Set: None
    Locator: A0
    Bank Locator: Bank0/1
    Type: Unknown
    Type Detail: None
    Speed: Unknown
    Manufacturer: None
    Serial Number: None
    Asset Tag: None
    Part Number: None
Handle 0x001B, DMI type 17, 27 bytes
Memory Device
    Array Handle: 0x0019
    Error Information Handle: Not Provided
    Total Width: 64 bits
    Data Width: 64 bits
    Size: 512 MB
    Form Factor: DIMM
    Set: None
    Locator: A1
    Bank Locator: Bank2/3
    Type: Unknown
    Type Detail: None
    Speed: Unknown
    Manufacturer: None
    Serial Number: None
    Asset Tag: None
    Part Number: None
詳細的使用說明就請使用 man dmidecode 來看囉~

2008年11月23日 星期日

BetaRadio v0.1.2 Ubuntu Linux i386 package for Intrepid Ibex

剛剛包出來的想要使用的朋友可以到 http://code.google.com/p/betaradio/downloads/list 下載使用
或是直接執行
wget http://betaradio.googlecode.com/files/betaradio_0.1.2-1intrepid1_i386.deb
sudo dpkg -i betaradio_0.1.2-1intrepid1_i386.deb

BetaRadio v0.1.2 Ubuntu Linux i386 package for Hardy Heron

剛剛包出來的想要使用的朋友可以到 http://code.google.com/p/betaradio/downloads/list 下載使用
或是直接執行
wget http://betaradio.googlecode.com/files/betaradio_0.1.2-1hardy1_i386.deb
sudo dpkg -i betaradio_0.1.2-1hardy1_i386.deb

2008年11月20日 星期四

使用 USB stick 來安裝 Debian GNU/Linux 5.0 (Lenny) rc1

參考安裝文件
首先去 FTP 下載 boot.img.gz
在隨便一個 Linux 系統上執行 (請小心確認 USB stick 的位置是否在 /dev/sda)

$ sudo su -c "zcat boot.img.gz > /dev/sda"
然後再把 debian-testing-i386-netinst.iso 複製到 USB stick 上就行了
接下來的動作就是使用 USB stick 開機
(當然使用 USB stick 開機要有主機板的硬體支援才行)
接下去就跟一般使用 debian-testing-i386-netinst.iso 所燒成的光碟來安裝的過程一樣

另外就是在 kernel cmdline (Grub畫面中按下 Tab) 裡面加上 desktop=lxde
這樣就可以直接把整個系統裝成 lxde 的桌面環境了~ ^o^

2008年10月31日 星期五

Ubuntu 8.10 DVD ISO 下載

Ubuntu 8.10 釋出囉~ :D
可是我想要下載的是 DVD 的 ISO 耶~ @_@a
用 Google 找了一下就找到了~ :D
http://torrent.ubuntu.com/releases/intrepid/release/dvd/
想要下載 Ubuntu 8.10 DVD 的人應該都來用這個 BT 種子才對~ ;)

2008年10月20日 星期一

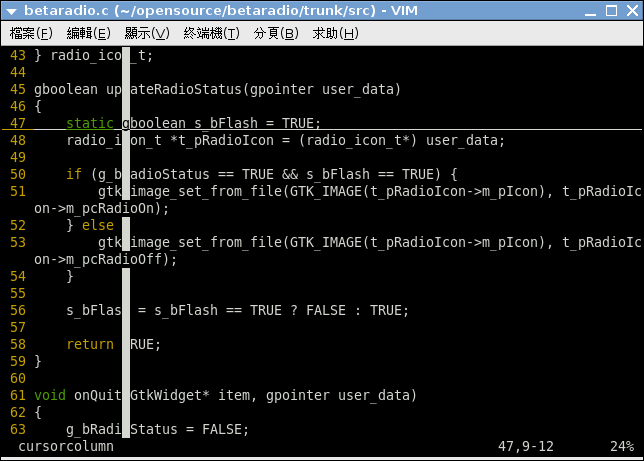
Vim :set cursorline :set cursorcolumn


剛剛增加了兩個快速鍵到 ~/.vimrc 當中
nmap <S-F11> :set cursorline!<BAR>set nocursorline?<CR>
nmap <S-F12> :set cursorcolumn!<BAR>set nocursorcolumn?<CR>
效果就有如上圖囉~ 有水平跟垂直的標線~ ^o^

Flash 的方塊字問題

在網路上面常常看到有人提供解決 Ubuntu 8.04.1 上面 Flash 中文方塊字的問題
方法都是把 /etc/fonts/conf.d/49-sansserif.conf 這個檔案給刪除掉
反正 /etc/fonts/conf.d/49-sansserif.conf 本身只是一個 soft link
刪除掉也不會怎麼樣大不了再從 /etc/fonts/conf.avail/49-sansserif.conf 弄回來就好了
可是這樣的解決方法雖然可以看到 Flash 上面的中文字了
但是在 Pidgin 上面的中文字反而就變形了
於是我提供另一個解決方法是
把 /etc/fonts/conf.d/49-sansserif.conf 當中的
<edit name="family" mode="append_last">
    <string>sans-serif</string>
</edit>
改成
<edit name="family" mode="append_last">
    <string>AR PL UMing TW</string>
</edit>
讓系統將 sans-serif/serif/monospace 以外的字型全部預設成 AR PL UMing TW
而不是原本的 sans-serif 這樣就暫時解決掉這個問題了
目前還沒有看到什麼 side effect

Firefox (zh-TW) 3.0 - Not compatible with Firefox 3.0.3


在 Ubuntu 8.04.1 上面的解決方法是
將 /usr/lib/firefox-addons/extensions/langpack-zh-TW@firefox-3.0.ubuntu.com/install.rdf 當中的
<em:maxVersion>3.0</em:maxVersion>
改成
<em:maxVersion>3.0.3</em:maxVersion>

2008年9月29日 星期一

Ubuntu 裡面惱人的中文目錄名稱

不知道在那個 Ubuntu 版本開始的
一些目錄名稱都變成了中文的
每次在開 Gnome-Terminal 使用時
都要使用中文輸入法才能進去用
要不然就是在 Nautilus 一個一個把名稱改掉
這樣才會反應到整個 Gnome 的環境中
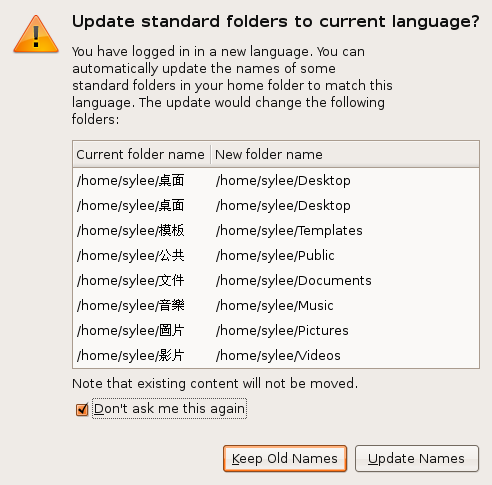
剛剛發現了一個比較優雅的解決方法
就是在 GDM 底下選擇英文語系登入
[選項]->[選取語言]
[英文(美國)]->[改變語言]
然後登入 Gnome 之後會出現

順便把 [Don't ask me this again] 然後再按下 [Update Names]
在登出 Gnome 然後登入 Gnome
原本沒有檔案的中文目錄會被自動刪除
再把中文目錄下的檔案都搬移到相對的英文目錄中
就可以把中文目錄刪除掉了

2008年9月24日 星期三

利用程式碼註解來達成 #if #else #endif 的效果

下面這段 C 語言的程式碼
#include <stdio.h>

int main()
{
    //*/
    printf("If\n");
    /*/
    printf("Else\n");
    //*/
    return 0;
}
效果相當於
#include <stdio.h>

int main()
{
#if 1
    printf("If\n");
#else
    printf("Else\n");
#endif
    return 0;
}
如果把第一個註解改成 /*/ 後
#include <stdio.h>

int main()
{
    /*/
    printf("If\n");
    /*/
    printf("Else\n");
    //*/
    return 0;
}
效果就相當於
#include <stdio.h>

int main()
{
#if 0
    printf("If\n");
#else
    printf("Else\n");
#endif
    return 0;
}
這個小技巧也可以應用在其他可以使用 // /**/ 當作註解的程式語言

像是 Java 沒有 macro 可以使用,遇到 JNI 這類的東西,系統上就一定要安裝相關的 native library 才可以使用 JNI,如果在 JNI 上面加上一層空殼再搭配這樣的技巧就可以快速地在 native function 與 pseudo function 之間切換。

改寫之前寫過的 JNI - Java Native Interface
class HelloWorld
{
    // If '/*/' use native, '//*/' use pseudo.
    //*/
    public int[][] multiply(int A[][], int B[][]) { return null; }
    /*/
    public native int[][] multiply(int A[][], int B[][]);
    static
    {
        System.loadLibrary("HelloWorldImp");
    }
    //*/

    public static void main(String[] args)
    {
        HelloWorld test = new HelloWorld();
        int[][] A = new int[5][5];
        int[][] B = new int[5][5];
        int[][] result = test.multiply(A, B);
        System.out.println(result[0][0]);
    }
}
如果只是要開發一些跟 JNI 功能無關的 Java 程式部份,又不想要安裝或是無法安裝那些相依的 native library 的時候就很方便了。 ^o^

2008年9月23日 星期二

網路印表機設定 : Ricoh Aficio 2022

  1. 首先到 http://www.linuxprinting.org/show_printer.cgi?recnum=Ricoh-Aficio_2022pxlmonoCustom PPD 檔案下載回來準備等一下使用
  2. 接下來打開 GNOME 裡面的印表機設定 [系統] -> [管理] -> [列印]
  3. 選擇 [新印表機]

  4. 找到 Ricoh Aficio 2022 192.168.1.50 後點選下一頁

  5. 選取 [Provide PPD file] 使用剛剛下載回來的 PPD
  6. 然後把 [Bypass Tray] 手動送紙匣 跟 [Duplex Unit] 雙面列印 都打開後就選取 [下一頁]
  7. 然後為印表機取個名稱再選取 [套用] 就可以了
  8. 最後設定完成的樣子


2008年9月19日 星期五

手動在 GNOME 中建立 Eclipse 的選單圖示

目前官方的最新版本是 Eclipse 3.4 (Ganymede)
可是在 Ubuntu Hardy 8.04.1 下面預設的 Eclipse 版本只有到 3.2.2
$ apt-cache policy eclipse
eclipse:
已安裝:(沒有)
  候選:3.2.2-5ubuntu2
  版本表格:
     3.2.2-5ubuntu2 0
        500 http://tw.archive.ubuntu.com hardy/universe Packages
於是就到官方網站上面直接下載 eclipse-java-ganymede-linux-gtk.tar.gz
解開後會出現一個 eclipse 的目錄
然後再增加一個檔案 ~/.local/share/applications/eclipse.desktop
[Desktop Entry]
Name=Eclipse
Exec=/home/user/eclipse/eclipse
Icon=/home/user/eclipse/plugins/org.eclipse.platform_3.3.100.v200806172000/eclipse48.png
Terminal=false
Type=Application
Categories=Development;
StartupNotify=true
這樣就可以在不影響系統環境的情況下建立一個自己使用的 Eclipse 3.4 的選單圖示囉~ ^o^

apt-cache showpkg pidgin

突然想要找出自己裝的 pidgin 到底是從那邊來的
於是找到了
$ apt-cache showpkg pidgin
Package: pidgin
Versions:
1:2.5.0-0ubuntu2~hardy1 (/var/lib/apt/lists/tw.archive.ubuntu.com_ubuntu_dists_hardy-backports_main_binary-i386_Packages) (/var/lib/dpkg/status)
 Description Language:
                 File: /var/lib/apt/lists/tw.archive.ubuntu.com_ubuntu_dists_hardy-backports_main_binary-i386_Packages
                  MD5: 8022320837ec3a36f994ce51f4055429

1:2.4.1-1ubuntu2.1 (/var/lib/apt/lists/tw.archive.ubuntu.com_ubuntu_dists_hardy-updates_main_binary-i386_Packages)
 Description Language:
                 File: /var/lib/apt/lists/tw.archive.ubuntu.com_ubuntu_dists_hardy-updates_main_binary-i386_Packages
                  MD5: 8022320837ec3a36f994ce51f4055429

1:2.4.1-1ubuntu2 (/var/lib/apt/lists/tw.archive.ubuntu.com_ubuntu_dists_hardy_main_binary-i386_Packages)
 Description Language:
                 File: /var/lib/apt/lists/tw.archive.ubuntu.com_ubuntu_dists_hardy_main_binary-i386_Packages
                  MD5: 8022320837ec3a36f994ce51f4055429
原來在 Ubuntu Hardy 上面我裝的 Pidgin 2.5.0 是來自 hardy-backports 這個 Ubuntu 更新啊~
[系統]->[管理]->[軟體來源] 當中的 [更新] 就可以找到 [不受支援的更新 (hardy-backports)]
打開後才可以直接在 Ubuntu Hardy 上面安裝 Pidgin 2.5.0
不過目前的 Pidgin 最新版本應該是 2.5.1 才對
可以到 GetDeb 下載安裝 http://www.getdeb.net/search.php?keywords=pidgin

2008年8月21日 星期四

Pidgin 2.5.0 釋出

http://pidgin.im/ 在幾天前釋出新版本 2.5.0
其中有許多關於 MSN 的改善
像是設定個人訊息、看別人的個人訊息、傳送離線訊息、接受離線訊息、直接將對方傳來的表情符號儲存起來使用等。
Ubuntu 8.04.1 的使用者可以到 http://www.getdeb.net/ 直接安裝 deb 檔案
大家快來用吧~ ^o^/

2008年7月17日 星期四

MSN protocol for Pidgin

http://code.google.com/p/msn-pecan/ 這個計劃主要在專注在 Pidgin 當中對於 MSN 功能的改善
像是離線訊息、個人訊息之類的
Debian/Ubuntu/Gentoo 的使用者可以參考 http://code.google.com/p/msn-pecan/wiki/HowToInstall 直接安裝來使用就可以了
所以喜歡使用 Pidgin 的使用者還是可以直接享受到 MSN 的一些新功能喔~ :D

2008年7月8日 星期二

Vim 小技巧: 自動移除行尾多餘空白

在 $HOME/.vimrc 裡面加上
autocmd FileType c,cpp,java,php,perl,python,ruby,sh autocmd BufWritePre  :call setline(1,map(getline(1,"$"),'substitute(v:val,"\\s\\+$","","")'))
這樣就可以在每次存檔的時候,自動地把行尾多餘空白都移除掉囉~ 很好用吧~ ^~^

2008年7月6日 星期日

:help changelog

Vim 裡面有個組合鍵在寫 ChangeLog 的時候特別地好用
不過這個組合鍵只有在開啟 ChangeLog 這個檔案名稱才會起作用
組合鍵:
'\' + o

另外就是在 $HOME/.vimrc 可以指定使用者名稱
let changelog_username = "Shih-Yuan Lee (FourDollars) <fourdollars@gmail.com>"

有在寫 GNU Style ChangeLog 的人才會覺得這個功能好用吧~ :P

更新 BetaRadio 與 hiChannel.sh 的來源網站

因為來源網站的網址有些變動 (就是網址前面要多接www)
所以原本那些聽網路廣播的軟體應該都是突然變得無法使用了吧... :P
BetaRadio 請到 Subversion 上面 Checkout 來自行編譯安裝
http://code.google.com/p/betaradio/
不然就直接開個 Terminal Console 來用 hiChannel.sh 吧~ :P
http://fd.idv.tw/tux/hiChannel.sh

2008年6月19日 星期四

:help new-vimgrep

Vim 7.X 有一個相當實用的功能 vimgrep
相關的說明可以參考 :help new-vimgrep
我自己則是定義了三個快速鍵來使用
nmap <s-f9> viwy:vimgrep /\<<C-R>"\>/g **/*.[ch] **/*.[ch]pp **/*.java **/*.p[ly] **/*.rb<CR>
nmap <c-n> :cn
nmap <c-p> :cp
這樣就可以很方便地在 C/C++/Java/Perl/Ruby/Python 的程式碼樹當中快速搜尋關鍵字~
使用 Ctrl+n 來跳到後一個出現的地方
使用 Ctrl+p 來跳到前一個出現的地方
連 Google Search 都沒有這麼好用~ :P

:help new-vim-server

其實早在 Vim 6.X 的時候就有的一個功能
在 Ubuntu 8.04 上面要裝上 gvim 才能夠使用
就是先執行一個 vim 來當 server
vim --servername VIM file1.txt
然後再執行
vim --remote-tab file2.txt
就可以把 file2.txt 開個 tab 在前面那個 vim-server 裡面了~
詳細的說明可以參考 :help new-vim-server

2008年5月18日 星期日

安裝 Ubuntu 8.04 到 EeePC 701/900 上面

安裝官方版本的 Ubuntu 8.04 後
在網路連線暢通下再執行一下
export LC_ALL=C
sudo aptitude install bzr
bzr branch lp:ubuntu-eeepc/0.1 ubuntu-eeepc-0.1
cd ubuntu-eeepc-0.1
./ubuntu_eeepc.py -g
sudo ./ubuntu_eeepc.py -i
就可以解決掉所有驅動程式的安裝問題

不過在 EeePC 900 上面要再多執行兩個的動作
sudo aptitude install subversion
svn checkout svn://svn.berlios.de/linux-uvc/linux-uvc/trunk linux-uvc
cd linux-uvc
sudo make
sudo make install
sudo modprobe -r uvcvideo
sudo mv /lib/modules/$(uname -r)/ubuntu/media/usbvideo/uvcvideo.ko /lib/modules/$(uname -r)/ubuntu/media/usbvideo/uvcvideo.ko.original
sudo cp uvcvideo.ko /lib/modules/$(uname -r)/ubuntu/media/usbvideo/uvcvideo.ko
sudo modprobe uvcvideo
來解決 WebCam 的問題

還有把 /etc/modprobe.d/snd-hda-intel 的內容加個 # 在最前面註解起來
這樣可以解決掉 EeePC 900 在執行過 ubuntu_eeepc.py 之後音效不見的問題

為了 EeePC 的螢幕顯示模式的切換寫了一個 bash script

使用 zenity 跟 xrandr 寫了一個簡單的 bash script 來做螢幕顯示模式的切換
當然這個 script 可以在所有的 Linux System 上面執行... :)
#!/usr/bin/env bash

mode="$(zenity --list --title '螢幕解析度切換' --text '請選擇' --column '顯示模式' \
'LVDS auto' \
'VGA 1280x1024' \
'VGA 1024x768' \
'VGA 800x600' \
'LVDS auto + VGA 1280x1024' \
'LVDS auto + VGA 1024x768' \
'LVDS auto + VGA 800x600')"

case $mode in
'VGA 1280x1024')
xrandr --output LVDS --off --output VGA --mode 1280x1024 --preferred
;;
'VGA 1024x768')
xrandr --output LVDS --off --output VGA --mode 1024x768 --preferred
;;
'VGA 800x600')
xrandr --output LVDS --off --output VGA --mode 800x600 --preferred
;;
'LVDS auto + VGA 1280x1024')
xrandr --output LVDS --auto --output VGA --mode 1280x1024 --preferred
;;
'LVDS auto + VGA 1024x768')
xrandr --output LVDS --auto --output VGA --mode 1024x768 --preferred
;;
'LVDS auto + VGA 800x600')
xrandr --output LVDS --auto --output VGA --mode 800x600 --preferred
;;
'LVDS auto')
xrandr --output LVDS --auto --output VGA --off
;;
*)
;;
esac

2008年5月1日 星期四

vim + ydict

我很久以前有改寫過一個 ydict 的 Yahoo! 命令列字典
放在
http://fd.idv.tw/tux/ydict

後來在 $HOME/.vimrc 裡面加上一行
map <C-K> viwy:!ydict <C-R>"<CR>

然後就是每天爽爽地使用 vim 上的 Ctrl+K 快速翻譯英文或中文
或是拿來做為英文的錯字檢查
剛剛有人覺得我這個使用方式還蠻好用的就順便寫篇文章分享給更多人知道~ ^_^

2008年4月26日 星期六

Ubuntu 7.10 -> Ubuntu 8.04

升級到 Ubuntu 8.04 後
開始準備接受問題的轟炸
首先是發現到 Firefox 3 Beta 5 有許多的 Add-ons 都不能使用了
像是 Google Toolbar, Google Browser Sync, Delicious Bookmark 這幾個我賴以維生的外掛... 囧rz

2008年4月14日 星期一

Lightning Talk at OSDC.tw 2008

投影片放在 http://fd.idv.tw/tux/osdc-2008.zip
因為時間沒有掌控好所以少講了一個功能... ~>_<~
$ hiChannel.sh -a

這樣就可以當作早晨的鬧鐘使用了... >w<
--
P.S. 鬧鐘功能在 Mac OS X 上面是爛掉的~ ^^|

2008年3月19日 星期三

Subversion 心得分享

在過年期間無聊打發時間的時候看了一下 Subversion Book
加上之前在國內某間軟體外商工作過的經驗
心中累積了一些軟體專案程式碼管理的想法
3/27 在 KatDC Open Space Forum 上面分享一些在軟體專案開發上版本控管的心得
主要的概念是軟體專案中的角色扮演跟責任的劃分
詳細的內容會在這個心得分享的活動當中介紹
報名的網址在 http://www.katdc.com/kosforum/index.jsp
--
P.S. 主辦活動的同事是正妹, 正妹說希望有多一點人可以報名參加. :)

2008年3月1日 星期六

EeePC 上面使用 pcmanx-gtk

改造前

改造後

這次新增的功能 Shift+Return 可以把所有的工具列與狀態列都隱藏起來
其實只是根據之前的全螢幕功能 Alt+Return 改出來的
改過的部分已經 commit 到官方的 Subversion Repository 上面了~ ^_^

2008年2月9日 星期六

BetaRadio v0.1.2 釋出

這個版本改善了記憶體漏水的問題
並且讓播放時圖示會閃爍
還有加入了實驗性的免費影視可能使用上會有些問題
希望可以在下個釋出版本改善
目前只提供 Source Code
http://code.google.com/p/betaradio/downloads/list

2008年2月8日 星期五

網路麻將

剛剛在聊天室跟很多長輩聊到 QKMJ 這個東東

我就想到為什麼沒有 AJAX MJ 讓人家一連上去就可以開始玩了

為什麼沒有 IRC 的 MJBot 讓別人跟它丟訊息就可以開始玩了

最後想在 Linux 找有沒有現成的免費線上麻將軟體可以玩...

居然完全找不到耶... 冏rz

突然就覺得我們應該發起一個計劃的 OpenMahjong

將麻將這個中華民族的國粹發揚光大~~~ >w<

http://en.wikipedia.org/wiki/Mahjong

http://code.google.com/p/openmahjong/

雖然我不會打麻將~ 不過我希望明年過年的時候可以在 Linux 上面玩到~ >_<

2008年2月4日 星期一

Ubuntu Gusty 上面有 Parallels Workstation 可以用了~

今天發現的更新 app-install-data-commercial
~$ dpkg -L app-install-data-commercial
/.
/usr
/usr/share
/usr/share/app-install
/usr/share/app-install/desktop
/usr/share/app-install/desktop/opera.desktop
/usr/share/app-install/desktop/parallels.desktop
/usr/share/app-install/channels
/usr/share/app-install/channels/gutsy-partner.list
/usr/share/app-install/channels/gutsy-partner.eula
/usr/share/app-install/icons
/usr/share/app-install/icons/opera.png
/usr/share/app-install/icons/parallels.png
/usr/share/doc
/usr/share/doc/app-install-data-commercial
/usr/share/doc/app-install-data-commercial/copyright
/usr/share/doc/app-install-data-commercial/changelog.gz

看起來就一整個像是有 Parallels Workstation 可以裝了嘛... >w<
在[應用程式]->[添加/刪除...]底下找一下 parallels 就可以安裝進系統了~ :D

介面看起來就像是用 Qt 寫的~ >w<

哇勒... 原來是要花錢購買才能完全使用的啊~ XD

我還是回去用 VirtualBox 就好了~ >_<

Google Code 的 Source 有新介面了~ :D

一大早就看到好消息... :D
http://hex-dump.blogspot.com/2008/02/google-code-svn-interface-improvements.html
BetaRadio 為例
Source 底下有分成 Checkout | Browse | Changes
Checkout 只是提醒你如何把 Source Code 取出

Browse 則是可以線上瀏覽目錄跟檔案內容

Changes 則是可以線上瀏覽每個變更的差異

Google 出品的當然是簡潔好用囉~ :D

2008年1月26日 星期六

bash: alarmRun

命令列下的指令真的很好玩
把幾個小指令組合起來就可以很容易達到某些功能了~ :P
#!/bin/sh

declare -i alarm_time=$(date -d "$(date +%D) $1" +%s)
declare -i now_time=$(date +%s)

if [ $alarm_time -le $now_time ]; then
alarm_time=$alarm_time+60*60*24
fi

until [ $now_time -ge $alarm_time ]; do
sleep 1
now_time=$(date +%s)
echo -en "\r現在是 $(date +%T) 鬧鐘設定在 $1"
done

shift

$*

把這樣的檔案存成 alarmRun 在給予 chmod +x alarmRun
這樣就可以
./alarmRun 07:00:00 mplayer alarm.mp3

在早上七點當鬧鐘使用了~ :D

2008年1月14日 星期一

glib - g_build_filename

在利用 glib 做程式開發時有個函式還蠻好用的~
g_build_filename
#include <glib.h>

int main(int argc, char *argv[])
{
gchar *filename = NULL;
filename = g_build_filename("/usr", "share", "pixmaps", "debian-logo.png", NULL);
g_debug("%s", filename);
g_free(filename);
return 0;
}
再搭配
$ gcc -Wall `pkg-config --cflags --libs glib-2.0` -o demo demo.c

g_build_filename 可以把後面接的名稱串接起來自動在名稱跟名稱之間加上 '/' 或是 '\'
端看你開發程式的平台是哪一種 (Windows/Unix)
要注意的是參數最後要以 NULL 結尾還有不使用的話要用 g_free 來把記憶體空間釋放掉

2008年1月7日 星期一

Adobe Flash Player version 9,0,115,0

最近發現到 Adobe Flash Player 在 Linux 上的 Firefox/Iceweasel 的選單介面不再出現亂碼了~
而且介面看起來也變漂亮多了~ 在網址列中輸入 about:plugins 發現使用的 Adobe Flash Player plugin 版本是 9,0,115,0
後來到 http://www.adobe.com/products/flash/about/ 看到 Windows/Mac OS X/Linux 三個平台上面的 flash 都是一樣新的版本~ (至少在寫這篇文章的時候是這樣的)
真是可喜可賀啊~ :-D

新的 Debian 桌面系統~ :-D

這個週末在 jouston 很久以前給我的 LiteON VT200 上面把 Xfce 桌面環境裝起來
原本只有裝上相當精簡的 Debian 4.0 (Etch) 來當做檔案伺服器使用
我拿到的 LiteON VT200 裡面的 CPU 應該是 VIA Eden ESP Processor 400 MHz
然後我自己去買了一條筆記電腦在使用的 256MB DDR333 的記憶體裝上去使用
在設定 XWindow 的過程中發現分享顯示的記憶體要有 32MB 才會正常地在 1280x1024 的解析度上面運作
就這樣家裡多了一台低耗電的 Linux 系統可以使用
同時拿來上網 (Iceweasel)、及時通聊天(Gaim)、打B(PCManX GTK+)、聊天室聊天(Irssi)、聽網路廣播(hiChannel.sh)
使用起來並不會有覺得不方便的地方反而會有一種特別的爽度~ :-D